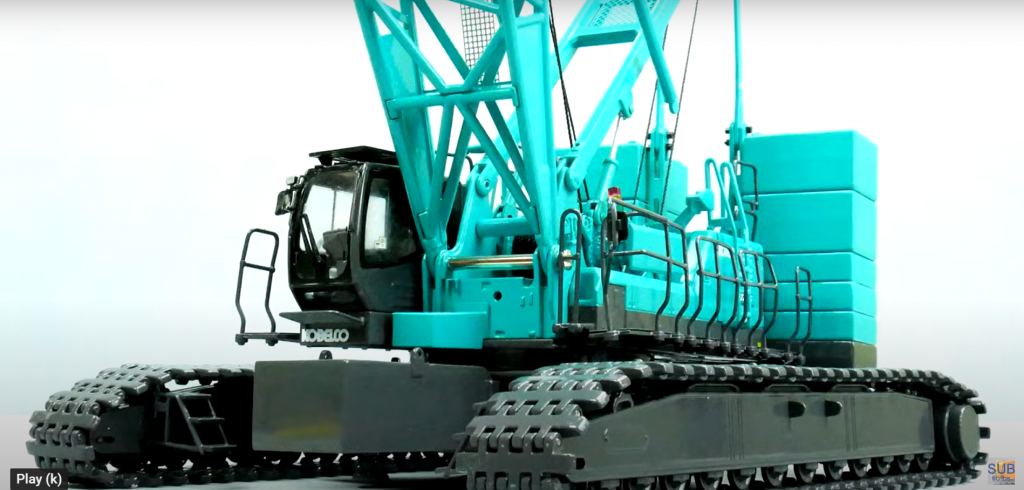
Tonkin Replica’s 1/50 scale model of the Kobelco 7250S Crawler Crane
And now for the lighter side of life…
The Kobelco 7250S is the top of the range Kobelco Crawler Crane and it has a maximum lifting capacity of 250 tonnes. Inside the outer shipping carton is a Kobelco branded box and that contains three layers of expanded polystyrene trays containing the many parts in the top trade. There’s a set of brochures and we’ll have a look at those in a moment. In the top layer there are a number of lattice spoon sections and going down into the second layer is more of the same.
The bottom layer has the caller tracks and body. One of the very nice aspects of this model is the inclusion of three brochures. The first is the general marketing brochure for Kobelco crawler cranes and it’s got some interesting information and photos. The second one we’re looking at is the manual for assembly of the model. It’s got a four parts list and it’s helped by also having the bags in the box individually labelled.
The instructions are comprehensive and there are step by step photos. The last brochure in the box is technical for the 7250S and it includes all of the load charts for the real crane. All of this means the presentation of the model is very good.
To start the assembly. We’ll insert the Jacks into what’s called the translifters and these are just a simple screwing attachment. There are four of them and if you want the crane to stand on its own 4ft then you need to insert some pins to keep the legs in position. Once that’s done, we can add the two big ballast blocks to the car body, but they’re not an easy fit because of a clash due to paint thicknesses and once in place you pin them in position. Next up, this crane likes to run around, so let’s give it some crawler tracks to do that, each frame gets offered up and then a couple of pins secure it into position.
One nice touch on the model is that there are travel clamps on the gantry and you remove these by undoing the nuts and bolts using the special tools provided. All it then needs is a tug to free up any stickiness in the paint work. To raise the gantry, you need to remove an elastic band. Just imagine how you’d get that off if they use the same thing on the real crane. The gantry is now being raised and you can see why it does need to fold because if it’s being transported, the crane would be too tall.
Otherwise now that it’s up, you secure it using some more nuts and bolts and we can move on to adding the counterweight tray at the rear. It hangs in position and is pinned and you need to use pliers unless you’ve got fingers the thickness of chopsticks. Actually, if you do have fingers like that, it must be really easy to eat Chinese food anyway. Enough of that nonsense. Let’s move on and load up the counterweight and the big blocks just rest in place, which does mean they can be dislodged.
Moving into the front, we’re attaching the boom foot, but again, because of tolerances and paint thicknesses, it takes some work to get it in position, and then you insert a big pin to secure it so that’s the main work done on the crane body to get it ready to be assembled. And for this part of the review, we’ll just set it up with a main boom. The lattice sections are all nicely made and they include internal bracing, and they joined together reasonably easily and are secured with more little nuts and bolts.
There are plenty of guy ropes that have to be made up too, and these are all joined together by more nuts and bolts. But before we go nut and Bolt crazy, let’s unwrap the laughing in gear.
This is prereaved in the factory, which is a help, but you have to be careful how you unwrap it to make sure you keep the tension on the pulleys. If you do let the thread jump off the pulleys, you’re definitely in for some frustration in getting it back on here we’ve raised up the boom so we can connect the end of the guy ropes to the loving bridle. The next step is a bit unusual. We have to attach the thread from the luffing fly jib onto the main winch drum.
There’s no natural tyingoff point, so the best way to do it is with a piece of clear tape stuck on the end of the thread.
It’s much less messy than glue, and it’s easily removable if you want to take the thread off, and it’s also quite secure once you’ve wear on the winch drum a few times. If you’re not using the luffing fly chip, then the loving bridal clips onto the boom in a slightly unusual way. So here we are with the boom up, and we’ve now weaved on the 70 tonne hook and included with the model is an ibeam load, which you can put on the hook to give it some more tension to finish off this part of the assembly, we just need to add on some detail and that includes steps on each of the four corners of the corner tracks, and there are plenty of walkways and hand rails to add.
Most of these are a good fit, but some of them you have to fiddle with to get them to stay in place properly. There’s a neat little cover which goes over the access point to the rear winch, and there’s another cover which goes over the front two winches for the detail.
We’ll start with the crawler tracks and the metal pads are nicely formed and the track frames are fairly simple without working rollers. The cab is very detailed and there are some tiny graphics, and another hot detail is this hot detail. All of the pulleys used on the model are metal, and there’s a high standard of detailing on the lattice sections, including tiny graphics. Most of the boom sections also include mesh walkways on the tower cap. Most of the connections are bolted so you can flatten things down for transport, and the little white wind gauge adds to the realism.
At the boomtop, there are more metal pulleys and some tiny holes are tying off points. Three metal hooks are supplied and they’re decent metal parts.
Let’s start by having a look at the crawler tracks and they are free rolling on each of the frames and are tensioned by spring loaded idlers. One of the features of a model like this, though, is that if you don’t want to build it up, you can use the parts as transport loads. So here the tracks are going on to a NoTOR boom low loader or as an alternative, we can load up some boom sections. One thing you can do with the model is to pretend to drive it like a real crane, but you can expect to wear out your wrist action.
So far, we have only assembled the model with a modest main boom, but there are plenty more main boom sections we can add in, and we can also put it into a tower configuration by adding in the optional luffingfly jib.
And here we have it all preassembled ready to add onto the model. Once you have it all built up, then you can display it with the luffing fly jib clipped to the boom. But one thing you can’t do is lower the angle too much because it will be unstable and there’s not enough thread on the boom drums. Still, there is enough thread for the loving jib, and you can winch that up into position. One thing to note is that the guy ropes aren’t all exactly the same length, so you might need to swap some spares to maintain equal tension.
Now that we’ve built the full model, let’s see how high it goes and it’s about 70 inches or nearly 180 centimer.
This is another very detailed Kobelco crane model by Tonkin replicas. It’s well presented and is flexible, with many different configurations being possible, and most of the features work well enough with just a few restrictions. But certainly a plus point is the very high detail level, and that makes it an outstanding model.